title
Canning 101: beans

by , 07-25-2008 at 08:38 PM (2786 Views)
Ive been canning green beans this week, around 100 quarts, and so I thought Id blog about how to preserve food.
Here are some basics.
There are two different types of canning, cool water bath and pressure canning.
here is a pressure canner
this is just a cool water bath canner
Cool water bath is actually boiling water. This method is only safe for certain foods like jelly and tomatoes. It doesnt get hot enough to kill some bacteria. Once the food in in the jars you place it in the canner, cover it with water and then boil for a specific amount of time.
Pressure canning is a different kind of canner with a pressure gauge. Water heated under pressure can get much hotter and therefore kill all kinds of bacteria. The jars of food do not need to be covered with water in the pressure canner.
basic canning supplies are
Food for preserving
Canning salt
Jars
Lids
Rings
Canner
canner rack
Spatula
Jar lifter
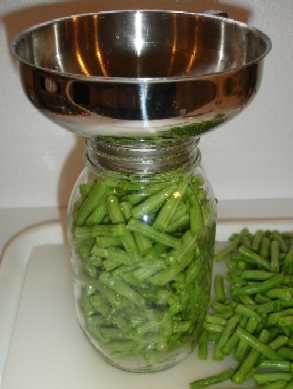
Canning funnel
(spices, lemon juice, vinegar)
here is a good canner rack
Food must be very fresh and of good quality. Table salt is bad for canning, it contains iodine which will cloud your food. Jars must be canning jars for the pressure canner or they may (and likely will)burst. Old mayonnaise jars are fine for the cool water bath. Jars must be inspected to insure they have no cracks in the glass or nicks on the rim. Lids are the flat part that seals the jar. They must be new, you shouldnt can with an old lid. Rings are the screw on part and can be reused over and over. Dont store jars with the rings on them or they will rust in place. The canner needs to have something in the bottom that prevents the jars from sitting right on the bottom. Pressure canners need to be tested every year to make sure the pressure gauge is accurate. This can be done for free at the county extension office. The spatula is for packing food into jars and releasing air bubbles. I bought a clear one and that was a mistake. I loose it all the time because I cant see it. The canning funnel has a bowl like top and a wide opening that fits into every size jar.
Possibly the most important thing is the Ball Blue Book. I wouldnt can without this book. Everyone needs a new one, its less than seven dollars and its important. Cooking times and standards have changed over the years. Eating under processed food is a health risk. I think if you are canning you need to take it seriously.
Each food is prepared a little differently. Ill talk about beans canned in quart jars. Pints are process for a different length of time. Green beans need to be washed, strung, and snapped into similar size pieces. Once that is done you can cook the beans before placing them in jars or you can raw pack them. I have done both and prefer to cook them first although raw packing saves all kinds of time.
Place pressure canner on the stove over high heat. Add three quarts of water. You can add a little vinegar to prevent discoloration of the pressure cooker.
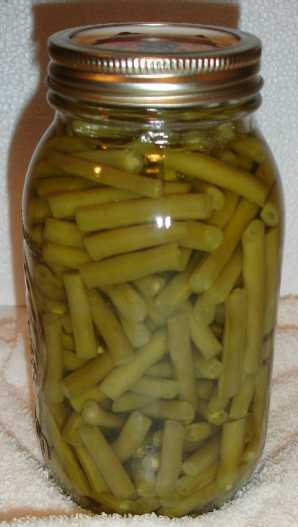
Place the funnel in the jar so that its easier to fill with veggies or fruit. Fill hot jars with hot food. Use the spatula to pack the beans in and add more until the jar is full. For beans, leave one inch head space. Mason jars are designed so that the large lip that sticks out at the top is one inch from the top. Add canning salt. Pour boiling water over the beans leaving one inch head space. Use the spatula to release any air bubbles by running it down the jar between the glass and the beans. Add more water as needed leaving one inch head space. Clean the rim of the jar and cover with hot lid (flat). Screw on the ring, but not too tightly.
Place the hot jar in the canner. Remember not to place the jar directly on the bottom of the canner. Lock the lid into place. Allow the pressure to build and steam to come for ten minutes. After ten minutes place the weight on the little spout and reduce heat so that pressure doesnt build too quickly. When the pressure gets to ten pounds start timing. Beans need to cook at ten pounds of pressure for 25 minutes. The heat will need to be adjusted down during that 25 minutes or the pressure will get too high.
Once the time is up turn the heat off and leave the canner alone. When the pressure gauge reaches zero and no steam is coming out from the weight remove the weight and lid. Lift jars out with jar lifter. Be careful as they will still be boiling inside. As the jars come out of the canner point the bottom of the jar away from you incase the jar pops. This will help prevent burns. Place the jars on a towel so that they are not touching. Allow them to cool completely before removing the rings. Check the seals with thumb.
great help is found here http://images.google.com/imgres?imgu...US257%26sa%3DN
maybe your pantry can look like this!